Information about Ultrasonic sensor
Information about Ultrasonic sensor
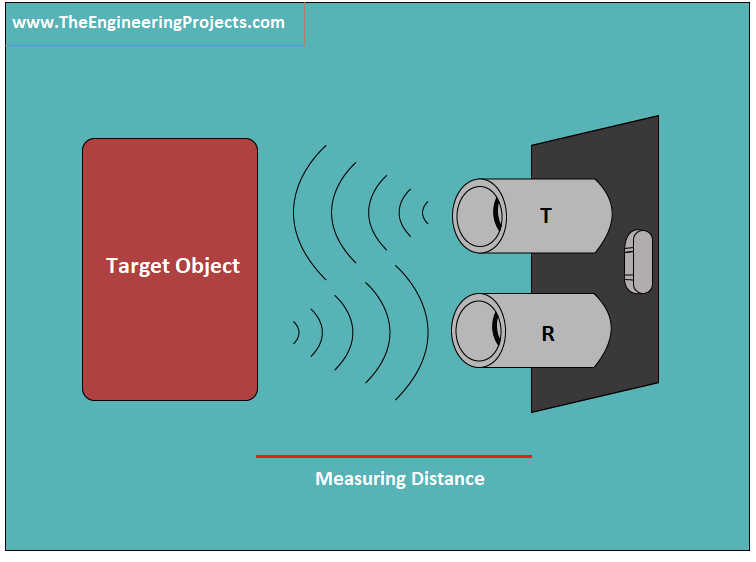
Hi Friends! I hope you are doing well. Welcome you Know To Robo. Today, I’ll discuss the basic Introduction to HC-SR04 Ultrasonic Sensor. It is an ultrasonic sensor, also known as an ultrasonic transducer that is based on a transmitter and receiver and mainly used to determine the distance from the target object.
The amount of time it takes to send and receive waves will determine how far the object is placed from the sensor. It mainly depends on the sound waves working on “non-contact” technology. The required distance of the target object is measured without any damage, giving you accurate and precise details.
This sensor comes with a range between 2cm to 400cm and is used in a wide range of applications including speed and direction measurement, wireless charging, humidifiers, medical ultrasonography, sonar, burglar alarms, and non-destructive testing.
In this post, I’ll try to cover basic details related to HC-SR04, so you get an idea what is this about and how it can be used in the major applications as per your needs and requirements. Let’s jump right in and get down to the details on this ultrasonic sensor.
Introduction to HC-SR04 ( Ultrasonic Sensor )
- HC-SR04 is an ultrasonic sensor mainly used to determine the distance of the target object.
- It measures accurate distance using a non-contact technology – A technology that involves no physical contact between sensor and object.
- Transmitter and receiver are two main parts of the sensor where former converts an electrical signal to ultrasonic waves while later converts that ultrasonic signals back to electrical signals.
- These ultrasonic waves are nothing but sound signals that can be measured and displayed at the receiving end.
- Following table shows the main features of this ultrasonic sensor.
- It gives precise measurement details and comes with accuracy (resolution) around 3mm, terming there might be a slight difference in the calculated distance from the object and the actual distance.
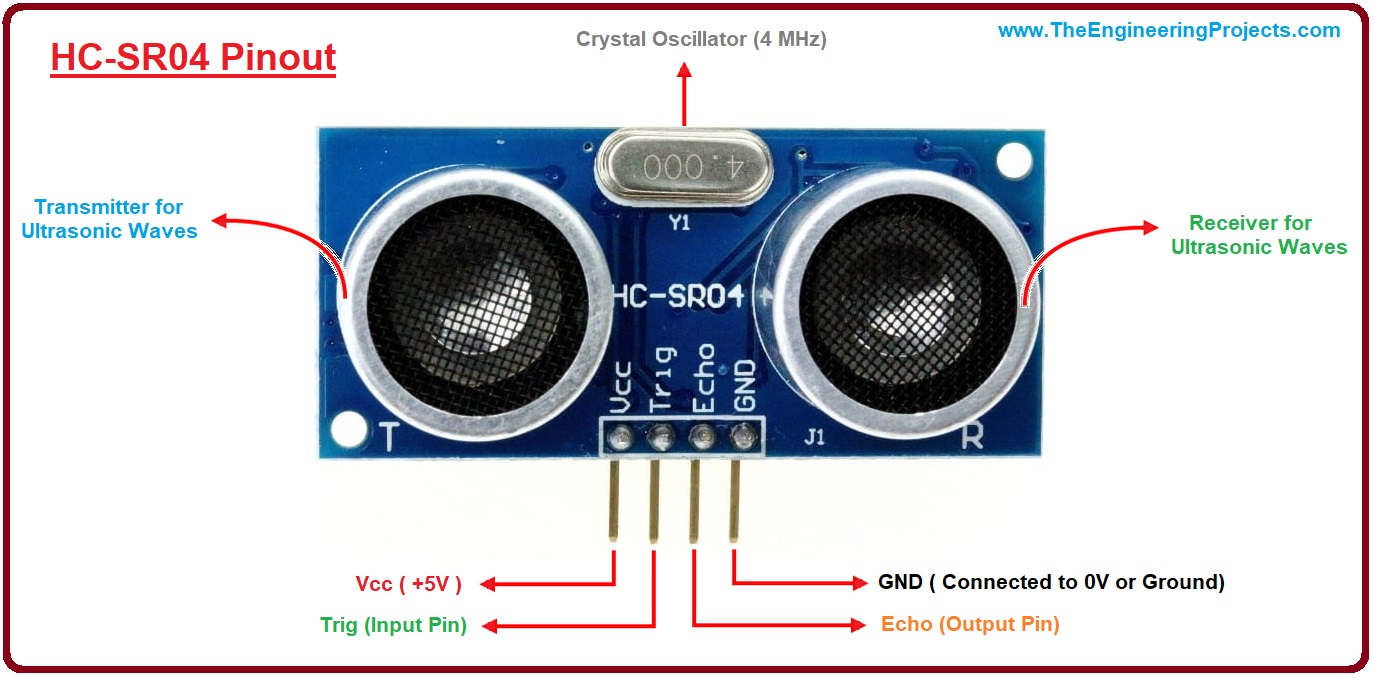
HC-SR04 Pinout & Description
- HC-SR04 contain 4 pins in total.
- Following table shows the HC-SR04 Pinout & Description:
- I have labelled these HC-SR04 Pinout in below figure for better visualization:
How does it work?
The HC-SR04 Ultrasonic (US) sensor is an ultrasonic transducer that comes with 4 pin interface named as Vcc, Trigger, Echo, and Ground. It is very useful for accurate distance measurement of the target object and mainly works on the sound waves.
As we connect the module to 5V and initialize the input pin, it starts transmitting the sound waves which then travel through the air and hit the required object. These waves hit and bounce back from the object and then collected by the receiver of the module.
The waves will be generating if the Trig pin is kept High for 10 µs. These waves will travel at the speed of sound, creating 8 cycle sonic burst that will be collected in the Echo pin.
The echo pin remains turned on for the time these waves take to travel and bounce back to the receiving end. This sensor is mainly incorporated with Arduino to measure the required distance.
Following formula is used to calculate the distance of the object.
S = (V x t)/2
Where S is the required distance, V is the speed of sound and t is the time sound waves take to come back after hitting the object. We need to divide the value by 2 because time will be double as the waves travel and bounce back from the initial point. Dividing it by 2 will give the actual distance of the target object.
Using HC-SR04 with Arduino Module
In order to get the precise distance measurement, HC-SR04 is mostly used in combination with different Arduino Modules like Arduino Uno and Arduino Mega. You can connect Arduino with this sensor in the following way.
- First, you need to power up the sensor using 5V DC regulated input to the sensor. Connect the ground pin with the ground of the voltage source. You can also power the sensor module using the Arduino 5V pins as the current drawn by the sensor is less than 15mA, won’t be affecting the current ratings of the Arduino Module.
After setting up the initial arrangement, connect both Trig and Echo pins to the I/O pins of the Arduino Board. As mentioned earlier, in order to initialize the measurement process, the Trig pin must be kept high for 10us in the start. The sensor module will start generating sound waves with the frequency around 40,000 Hz per second from the transmitter.
- As the waves bounce back, consequently, the Echo pin will turn on until the sounds waves are received by the receiver. This time will be calculated using Arduino Module.
- HC-SR04 comes with a wide range of applications mainly targeting distance and direction measurements. Following are the major applications it can be used for.
- Speed and direction measurement
- Wireless charging
- Humidifiers
- Medical ultrasonography
- Burglar alarms
- Embedded system
- Depth measurement
- Non-destructive testing
That’s all for today. I hope I have given you everything you needed to know about this sensor. If you are unsure or have any question, you can approach me in the comment section below. I’d love to help you the best way I can. Feel free to keep us updated with your valuable feedback and suggestion, they help us stay above the curve and give you quality content as per your demands. Thanks for reading the article.
Circuit connections of HCSR05 with Ardiuno

Code for HCSR05
// Include Libraries
#include "Arduino.h"
#include "NewPing.h"
// Pin Definitions
#define HCSR04_PIN_TRIG 3
#define HCSR04_PIN_ECHO 2
// Global variables and defines
// object initialization
NewPing hcsr04(HCSR04_PIN_TRIG,HCSR04_PIN_ECHO);
// define vars for testing menu
const int timeout = 10000; //define timeout of 10 sec
char menuOption = 0;
long time0;
// Setup the essentials for your circuit to work. It runs first every time your circuit is powered with electricity.
void setup()
{
// Setup Serial which is useful for debugging
// Use the Serial Monitor to view printed messages
Serial.begin(9600);
while (!Serial) ; // wait for serial port to connect. Needed for native USB
Serial.println("start");
menuOption = menu();
}
// Main logic of your circuit. It defines the interaction between the components you selected. After setup, it runs over and over again, in an eternal loop.
void loop()
{
if(menuOption == '1') {
// Ultrasonic Sensor - HC-SR04 - Test Code
// Read distance measurment from UltraSonic sensor
int hcsr04Dist = hcsr04.ping_cm();
delay(10);
Serial.print(F("Distance: ")); Serial.print(hcsr04Dist); Serial.println(F("[cm]"));
}
if (millis() - time0 > timeout)
{
menuOption = menu();
}
}
// Menu function for selecting the components to be tested
// Follow serial monitor for instrcutions
char menu()
{
Serial.println(F("\nWhich component would you like to test?"));
Serial.println(F("(1) Ultrasonic Sensor - HC-SR04"));
Serial.println(F("(menu) send anything else or press on board reset button\n"));
while (!Serial.available());
// Read data from serial monitor if received
while (Serial.available())
{
char c = Serial.read();
if (isAlphaNumeric(c))
{
if(c == '1')
Serial.println(F("Now Testing Ultrasonic Sensor - HC-SR04"));
else
{
Serial.println(F("illegal input!"));
return 0;
}
time0 = millis();
return c;
}
}
}


Comments
Post a Comment